Introduction: a 5 a.m. start, a delivery deadline, and a camera in the pocket
Just after 5 a.m. in the Stellenbosch winelands, a small-batch sauce maker is already moving through a quiet production space. Labels are checked, caps are tightened, and cartons are counted because the first delivery window will not wait for latecomers. A message from a buyer in Gauteng arrives asking for “proper pictures” for an internal catalogue review, and the request lands right in the middle of dispatch prep. In moments like these, food photography for beginners becomes a practical business skill, not a creative extra.
For many South African food SMEs, products travel further than the owner can, and buyers often decide before a sample ever arrives. Clear photos reduce back-and-forth about pack sizes, carton counts, and label details, which helps buyers plan storage, picking, and deliveries. Strong images also help logistics partners understand what must be protected in transit, whether that means keeping a shrink-sleeve label intact or preventing condensation on chilled packs. Done well, food photography for beginners supports marketing and the supply chain at the same time.
Table of Contents:
TL;DR: Key Takeaways
- Photograph like a supplier, not like an influencer: show the unit, the case, and how it ships.
- Use daylight, stability, and clean backgrounds so labels and barcodes stay readable.
- Build a repeatable routine tied to dispatch days so visuals stay current when packs change.
- Include logistics-critical details: batch codes, best-before dates, case markings, and stackability.
The buyer’s first question is often logistical, not creative
A retailer, distributor, or foodservice buyer rarely starts with “does this look pretty”. The first questions are usually practical: how is it packed, how is it stored, and how will it move through the network without breakage or spoilage.
That is why product photography for food should include functional views that show handling and transport realities, not only lifestyle serving scenes. For food photography for beginners, this shift removes guesswork and turns photos into a sales tool that operations teams can actually use.
When a product enters a distribution network, it must fit into racking, picking routes, and last-mile constraints. Even before the first order, buyers often share images internally with operations, quality assurance, and merchandising teams.
Photos that show dimensions, labelling, and case configuration reduce friction and shorten decision cycles. Food photography for beginners works best when it answers those internal questions upfront.
Why food photography for beginners is a market-access shortcut for South African SMEs
South African food SMEs compete in a concentrated market, and shelf space is earned through trust and consistency. Professional-looking images help a small brand look like a reliable supplier, not a once-off hustle, which can make conversations with bigger buyers smoother.
Better images also improve how products appear in directories, trade guides, and buyer decks, especially when a business is being discovered through search or AI answers. Food photography for beginners is a low-cost way to raise credibility while budgets are tight.
To ground the scale of demand, the latest Statistics South Africa release on the food and beverages industry reports an increase in real income in October 2025 compared with October 2024. That signals an active market where buyers keep scanning for dependable suppliers and consistent stock flow.
See the Stats SA food and beverages industry release for October 2025 for the exact figures and context.
Food and Beverage Trade South Africa exists to bridge producers and the wider trade ecosystem, and strong visuals lift every listing, profile, and pitch that runs through that ecosystem. A buyer scanning a supplier list is more likely to pause on a profile that shows clear packaging, consistent lighting, and accurate colour.
For context that helps frame positioning and buyer expectations, review the platform’s overview of the food and beverage industry in South Africa. Food photography for beginners becomes far easier when it is guided by what B2B buyers actually need.
Plan the shoot around dispatch, not around perfection
The easiest way to keep photos fresh is to tie the workflow to the moments that already happen. Dispatch day is ideal because multiple SKUs, formats, and cartons are already staged and clean, and it mirrors the product that arrives at a customer.
It also protects the cold chain because chilled items can be photographed quickly right before loading. Food photography for beginners becomes sustainable when it is attached to real operations, not to an “ideal” studio day that never arrives.
A simple plan starts with a shot list and a clean corner near a window, open roller door, or shaded loading bay. Aim for repeatability rather than novelty, because consistency is what makes a catalogue look trustworthy.
If packaging changes, reshoot immediately, because outdated labels create compliance risk and customer complaints. Food photography for beginners is most effective when it is treated like version control for packaging.
A shot list that matches transport and warehousing needs
A standard image set should cover the single unit, the inner pack if relevant, the outer carton, and how cases stack. Capture a front and back unit shot with labels readable, then take close-ups of ingredients, nutritional panel, barcode, and batch coding.
Add an outer-carton shot with case markings visible, including any “this side up” indicators and handling notes. Food photography for beginners improves quickly when the shot list is fixed, because the brain stops making decisions and starts producing consistent assets.
This approach supports both sales and operations because the same images can be used in pricing sheets, onboarding packs, and quality checks. It also reduces confusion when a third-party logistics provider asks what is arriving at the depot and how it should be handled.
A neat image set becomes a shortcut for specification conversations that usually take too many emails. Food photography for beginners becomes “professional” the moment it behaves like documentation.
Smartphone food photography tips that work in a factory, not a studio
A smartphone is good enough for most SMEs, but technique matters more than the model. Clean the lens, turn on grid lines, and prioritise sharp focus on the label, because the label is the product in a buyer’s eyes. Use the 1x lens as the default because ultra-wide lenses distort shapes and make cartons look curved, which quietly signals unreliability.
Food photography for beginners becomes dramatically sharper when lines are straight and text is readable.
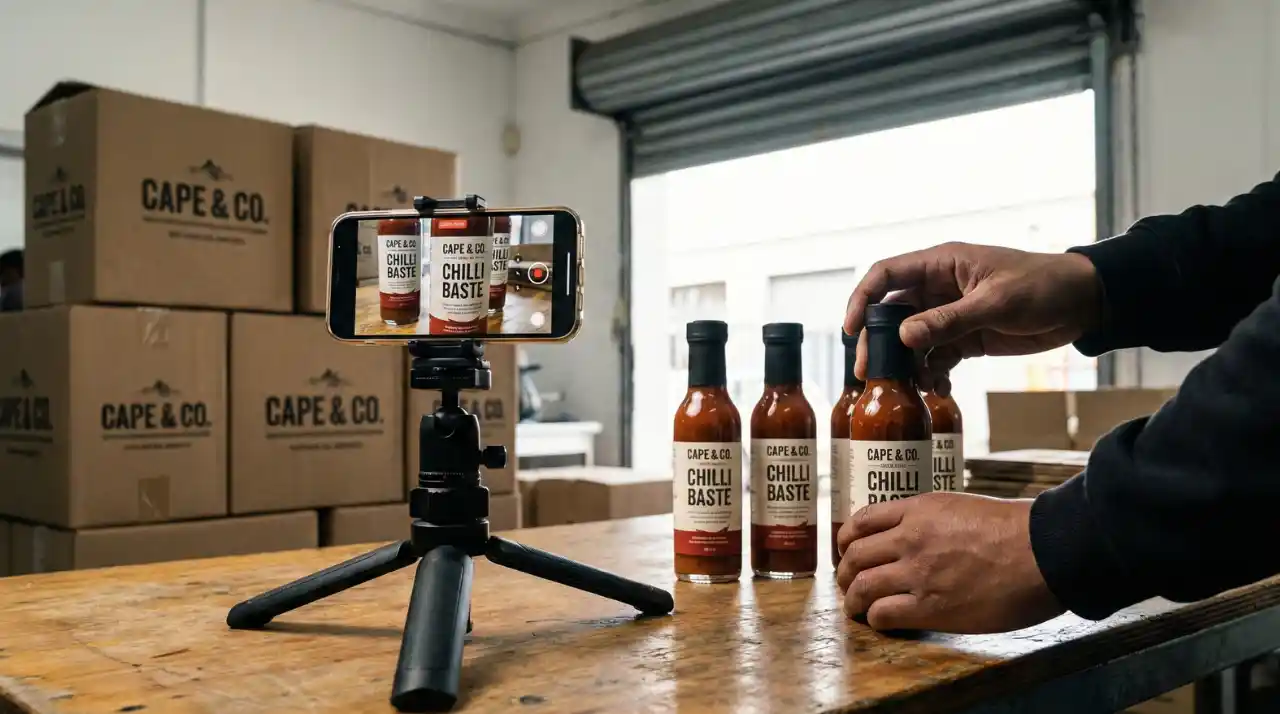
Stability is the biggest upgrade and it costs very little. A small tripod, a clamp, or even a stable crate stack prevents blur when hands are busy. Keep a simple background board nearby so the same look can be repeated across multiple production days.
These smartphone food photography tips are designed for speed and consistency, which is exactly what food photography for beginners needs in a working facility.
Low-cost kit that travels between kitchen, warehouse, and market stall
A compact kit can live in a small plastic tub and be pulled out when needed. A basic tripod, a neutral background board, and a white foam board reflector cover most needs, and a microfiber cloth keeps jars and bottles clean.
Add a roll of removable tape and a spare label sample for quick fixes, because small visual issues become big trust issues on a buyer’s screen. Food photography for beginners improves when the kit is always ready, because “later” rarely comes for a busy SME.
Because transport and handling matter, keep one clean carton sample for photographs that show case markings. Buyers often need to see how units are protected in transit, and those details are hard to explain in text. A quick photo answers the question and keeps the conversation moving.
For directory-oriented supplier visibility and packaging expectations, the platform’s guide to food suppliers and sourcing options is a helpful reference point.
Use daylight like a pro, even when load shedding hits
Lighting decides whether a phone photo looks professional or amateur, and soft daylight is often the best option. Use a window or open door, keep the product in bright shade, and avoid direct sun because hard shadows make labels difficult to read and misrepresent colour.
A thin curtain or a shaded doorway creates soft light that flatters both food and packaging. Food photography for beginners becomes far more consistent when light is treated as a predictable input, not a lucky accident.
Load shedding can disrupt planned shoots, so it helps to have a daylight photo spot that does not rely on overhead lighting. A corner near a large window, a covered stoep, or a shaded loading bay can work well.
Use the foam board reflector to bounce light into the darker side of a jar or pouch and keep the label evenly lit. Food photography for beginners stays dependable when the setup survives real-world disruption.
Reduce glare on jars, pouches, and shrink sleeves
Glare is common in product photography for food because packaging is often glossy for shelf impact. Move the product slightly off-axis from the window so reflections fall away from the label, then raise the phone and angle down to shift glare off the main panel.
Wipe packaging before the shot because fingerprints catch light and ruin the clean look buyers expect. Food photography for beginners is about repeatable clarity, and glare is the enemy of clarity.
The goal is legibility, not drama. If a buyer cannot read the label on screen, the photo has not done its job, and questions will keep coming. Clear labels also help quality teams check compliance details before products travel across provinces.
Food photography for beginners becomes a supply-chain habit when every label word is treated like a checklist item.
Compose for catalogues, not only for likes
Many SMEs chase trends and forget the channels that actually drive orders, such as catalogues, buyer decks, and trade directories. These channels prefer clean framing and enough empty space for text overlays, so keep the product centred or slightly off-centre with room around it.
Shoot both portrait and landscape because different platforms and buyers use different formats. Food photography for beginners becomes more useful when every image is easy to crop, place, and reuse.
When creating social media food pictures, treat the catalogue shot as the backbone and lifestyle content as the supporting layer. Behind-the-scenes packing shots build trust, while clean pack shots close deals, especially in B2B where procurement teams need proof.
A balanced library makes it easier to respond quickly when a tender or listing deadline appears with little warning. Food photography for beginners works best when one shoot feeds both marketing and sales operations.
Show scale and stackability in one simple frame
A single pack shot is useful, but it does not show whether the product is small, large, or awkward to handle. Add a “case with one unit in front” photo to show scale and how units are protected in transit, then add a tidy stack of cases to show stability.
This helps logistics partners plan space and reduces surprises on delivery day, especially when products move through multiple depots. Food photography for beginners becomes buyer-ready when it shows how the product behaves in the supply chain.
If products are chilled or frozen, show the insulation approach, whether that is a cooler box, ice packs, or an insulated shipper. That visual proof supports conversations about cold chain and shelf life and reassures buyers that deliveries are handled responsibly.
For producers expanding capacity, the platform’s overview of food products manufacturers in South Africa can help map how buyers compare suppliers and what visuals they expect to see.
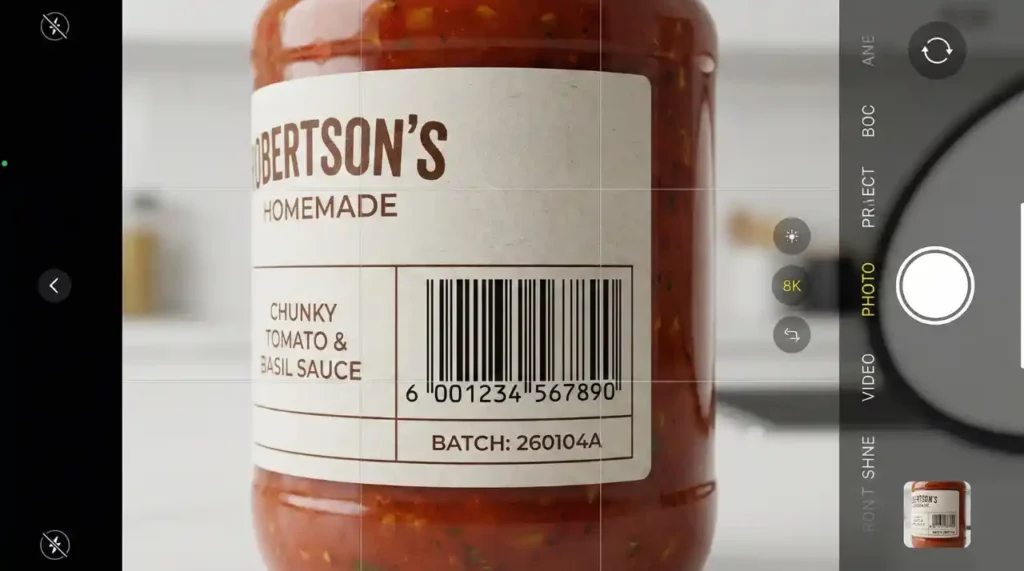
Photograph the information that keeps products moving
Packaging is more than branding, it is information for the supply chain, and the camera should capture that information clearly. Buyers and logistics partners need to see batch codes, best-before dates, allergens, and barcodes, and these must be readable on a phone screen.
Take a close-up photo for each of these areas and check sharpness before moving on, because redoing the shoot later costs more time than doing it properly now. Food photography for beginners becomes professional when it supports traceability and reduces friction in onboarding.
These details reduce the risk of incorrect listings in internal systems, which can cause picking errors and delivery disputes. They also make it easier for quality assurance teams to verify compliance before a product is listed or shipped.
Clear documentation-style photos are especially helpful when products travel across provinces and multiple depots handle the same SKU. Food photography for beginners should always include these close-ups, even if lifestyle content feels more exciting.
Include outer cartons and pallet-ready cues
Outer carton photos are often missing, yet they are crucial for warehousing and receiving. Photograph the carton from an angle that shows the main panel and any markings, such as “this side up”, barcode labels, and lot coding, and make sure the text is readable.
If cartons are printed, capture the print cleanly, and if cartons are labelled, capture the label without glare. Food photography for beginners becomes far more valuable when outer cartons are treated as essential, not optional.
Where possible, capture at least one pallet-ready image, even if it is a partial stack. Show how cases align, how corners are protected, and how much overhang exists, because these details affect wrap stability and damage risk.
This supports conversations about minimum order quantities and pallet configuration, which often decide whether a buyer can trial a product quickly. Food photography for beginners helps logistics teams plan, which helps the business deliver reliably.
Edit fast on the phone, and keep the colours honest
Editing should make photos clearer, not fake, because trust is built on accuracy. Start with a simple crop to straighten lines and remove clutter, then adjust exposure so labels are readable.
Tweak white balance so packaging colours match real life, because a colour shift can create disappointment when stock arrives. Food photography for beginners stays credible when edits protect truth, not hype.
For SMEs, file size and sharing speed matter, especially when buyers want images over email or WhatsApp. Save a high-resolution version for print and a compressed version for quick sharing, and keep both in the same folder structure.
Use consistent settings across products so a catalogue looks uniform, even when photos were taken on different days. Food photography for beginners becomes “brand-consistent” when the editing approach is consistent.
File names and folders that make sense to buyers and logistics partners
A messy folder creates delays when a buyer asks for the latest label close-up an hour before a meeting. Use a naming convention that includes SKU, flavour, pack size, and date, then separate folders for unit shots, carton shots, and compliance close-ups.
This makes it easy to share a complete asset pack with a distributor or a 3PL, and it reduces interruptions during production hours. Food photography for beginners becomes a time-saver when organisation is treated as part of the craft.
A tidy library is also useful internally, especially when multiple staff members handle marketing and sales. Staff can cross-check labels against production runs, and sales teams can respond quickly without interrupting operations.
Over time, this simple discipline becomes a competitive advantage in a market where reliability is prized. Food photography for beginners becomes a business system, not a one-person task.
Build a repeatable routine tied to logistics moments
The easiest routine is small and regular, because SMEs have limited time and many hats to wear. Choose one day a week, often a busy dispatch day, and photograph only what changed since last week, such as a new label print run or a carton configuration update.
Keep the standard shot list and tick it off quickly so operations do not stall. Food photography for beginners becomes sustainable when it is incremental.
Link the routine to logistics moments: new routes, new depots, new distributors, or seasonal peaks. This makes photos a living asset that reflects real operations, not a one-time campaign that goes stale. It also aligns naturally with the platform’s guide to SA food supply chain challenges, where transport disruption shows why clarity matters. Food photography for beginners becomes risk management when it reduces confusion during disruptions.
Common mistakes that quietly hurt sales and deliveries
Blurry labels are a silent deal-killer because they create doubt, and doubt slows buying decisions. Fix this with stability, better light, and a quick sharpness check before packing the kit away.
Cluttered backgrounds make the business look chaotic, which signals operational risk to buyers and distributors. Food photography for beginners improves fast when the background is simplified and the label is always crisp.
Another common mistake is showing only styled food shots without showing how the product is shipped. That leaves logistics teams guessing, slows onboarding, and increases the chance of damaged deliveries or wrong storage assumptions.
Fix it by adding carton and pallet cues to every product set, even if the first pallet is only a partial stack. Food photography for beginners protects sales when it protects expectations.
Conclusion: professional-looking photos that support both marketing and logistics
South African food SMEs already fight hard battles: power interruptions, tight budgets, and complex routes from factory to shelf. In that environment, professional-looking product photos are not a nice-to-have, they are a practical tool for selling and delivering. Clear visuals reduce misunderstandings about packing, labelling, and handling, which helps products move smoothly through depots and last-mile delivery. Food photography for beginners belongs on the same priority list as stock control and dispatch planning.
A smartphone, a bit of daylight, and a repeatable routine are enough to lift credibility and shorten buyer decision time. The key is to photograph what the supply chain needs, not only what a trend rewards. For economic context that affects costs, pricing pressure, and buyer behaviour, the SARB Monetary Policy Review for October 2025 provides the inflation outlook that shapes planning and margins.
South African Reserve Bank For a broader view of operational realities, the platform’s guide to challenges facing SA’s food trade market is a useful companion, especially when scaling beyond local routes.ert browsers into buyers. Keep it honest, keep it repeatable, and keep it moving. Over months, these small, steady improvements compound into something powerful: trust. That’s the difference between being seen and being stocked.
FAQ
How many photos does a distributor usually need to list a product?
A practical minimum is a clean unit front, unit back, and at least one label close-up that shows barcode and batch coding. Add an outer-carton shot with case markings, because warehouses often need this for receiving and picking setup. If chilled or frozen, include one photo that shows the insulation method so cold chain expectations are clear. This small set reduces the most common onboarding delays.
What is the fastest way to stop blurry label photos on a smartphone?
Stability fixes most blur, so a small tripod or a clamp is the first upgrade. Good daylight is next, because brighter light allows the phone to use a faster shutter speed. Tap to focus on the label and hold still for a second after tapping so focus locks properly. A quick zoom-in check before moving on prevents wasted time later.
Should lifestyle shots be used, or only pack shots?
Pack shots are the “yes or no” assets for buyers and logistics teams, so they should be prioritised. Lifestyle shots are still useful for social media food pictures and for showing serving suggestions, but they should never replace clear packaging documentation. A strong approach is one clean catalogue pack shot plus one lifestyle image per SKU. That balance supports both marketing and B2B conversion.
How can photos help with cold chain and delivery disputes?
Photos that show the packaging, insulation, and case configuration make expectations explicit before shipping. This reduces arguments about damage, leakage, or condensation because the intended handling is visible. Label close-ups also support traceability and product verification if a problem is reported. In a tight-margin SME operation, preventing one avoidable return can be a major win.
What background works best when there is no studio?
A plain board in white, light grey, or a warm neutral works well and is easy to keep consistent. The background should not compete with the label or hide the product edges. A dedicated “photo corner” near a window is often enough, even in a small facility. Consistency is more important than having a perfect setup.
How often should product photos be updated?
Update immediately when the label, cap, pack size, carton, or ingredients panel changes. For stable products, a monthly check is usually enough to confirm nothing has drifted. Tie updates to dispatch day so the routine stays realistic. Fresh photos reduce the risk of mismatched listings and compliance confusion.